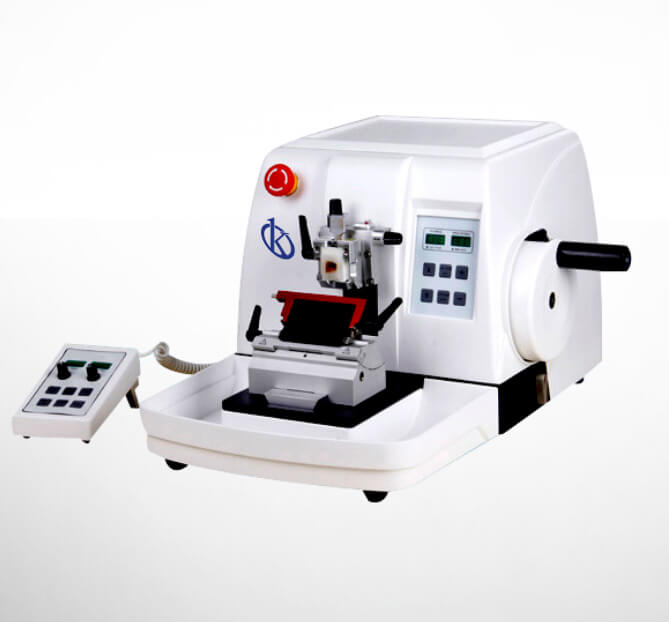
Installation and Commissioning Guide for the YR415-1 Automated Microtome
The YR415-1 Automated Microtome represents a leap forward in laboratory slicing technology, designed for reliability and precision. This guide focuses on the critical steps necessary for the successful installation and commissioning of the YR415-1, ensuring optimal performance in your laboratory environment.
Understanding the YR415-1 Automated Microtome
The YR415-1 Automated Microtome is engineered with an aerodynamic design, advanced features, and user-centric interface. It utilizes a smart control mechanism for feeding, allowing quick switching between manual and automated sectioning modes. With its adjustable automated slicing speed, advanced drive systems, and multiple functionalities, the YR415-1 ensures superior sectioning performance.
Technical Specifications of YR415-1
| Specification | Details |
|---|---|
| Model | YR415-1 |
| Type | Rotary |
| Mode of Use | Automatic |
| Maximum Sample Size | 70x70mm |
| Minimum Cutting Thickness | 0.25 μm |
| Horizontal Feed | 28 mm |
| Vertical Sample Stroke | 70 mm |
| Sample Holder Rotation | Any angle within 360 degrees |
| Blade Base Movement Range | 0-60 mm (front to back) |
| Blade Press Plate Movement Range | 0-23 mm |
| Sample Clamp Rotation | Any angle within 360 degrees |
| Sample Orientation | XY-8° |
| Speed Adjustment | 1500 μm/s ~ 3500 μm/s |
| Precision Error | ±1% |
| Working Voltage | AC 220V±10% 50Hz (standard model); AC110V±10% 60Hz |
| Power | 150W |
| Dimensions | 580×475×340 mm (Width×Depth×Height) |
| Net Weight | 41kg |
Unboxing and Initial Setup
Upon receiving the YR415-1, carefully unbox the unit, ensuring all components are intact. The package should include:
- YR415-1 Microtome Unit
- User Manual
- Power Cable
- Sample Holders
- Maintenance Tools
Next, place the microtome on a stable, level surface away from direct sunlight and humidity. Ensure that the area is well-ventilated to maintain operation temperature.
Power-Up Sequence
Connect the power cable to a suitable electrical outlet. Turn on the device using the main power switch, typically located at the rear. The display will illuminate, showing the default settings. Allow the device to perform self-checks before proceeding.
Calibration and First Run
Calibration is essential to ensure accurate sectioning. Follow these steps for calibration:
- Set the desired thickness using the digital control panel.
- Insert a calibration block or a sample of known dimensions.
- Run the microtome in automatic mode and check the output thickness.
- Adjust settings as necessary to match the desired specifications.
Common Setup Mistakes
New users often encounter setup issues. Here are common mistakes to avoid:
- Improper leveling of the microtome, leading to uneven cuts.
- Incorrect power supply settings, causing operational errors.
- Failure to calibrate before first use, resulting in inaccurate sectioning.
Site Requirements and Environmental Conditions
For optimal operation of the YR415-1, consider the following environmental conditions:
- Temperature: 18°C to 25°C
- Humidity: 30% to 70%
- Electrical Supply: Stable voltage within specified limits
- Clearances: Minimum of 50 cm around the device for ventilation
Frequently Asked Questions
What are the main features of the YR415-1 Automated Microtome?
The YR415-1 Automated Microtome features an aerodynamic design, smart control for sample feeding, adjustable slicing speeds, advanced safety systems, and user-friendly digital displays for thickness and slicing speeds.
How do I calibrate the YR415-1 for accurate sectioning?
Calibration involves setting the desired thickness on the control panel, inserting a calibration block, running the microtome, and adjusting settings based on the output thickness to ensure precision.
What should I do if the YR415-1 displays an error code?
Refer to the user manual for a list of error codes. Common troubleshooting steps include checking connections, resetting the machine, and ensuring proper calibration.
Is there a required maintenance schedule for the YR415-1?
Regular maintenance involves cleaning the blade holder, checking for wear on components, and recalibrating every few months or after significant use to maintain performance.
How can I ensure the durability of the YR415-1?
To enhance the microtome's longevity, operate it within specified environmental conditions, perform regular maintenance, and use only compatible accessories and blades.
Where can I find spare parts and consumables for the YR415-1?
Spare parts and consumables can be found through authorized dealers and the manufacturer, ensuring compatibility and warranty coverage.
How do I request a quote for the YR415-1?
You can request a quote through authorized dealers or directly from the manufacturer, providing details about your specific needs and usage scenarios.
Conclusion and Call to Action
If you are looking for a fusion of innovation and quality, you have come to the right place. At Kalstein, we offer you the luxury of exploring our exclusive catalog of laboratory equipment. We manufacture every device to the highest standards of excellence. Our intuitive and seamless online purchasing channels are designed for your convenience, securing the most competitive prices. Hesitate no longer — we bring science to life, it is time to become part of our community.