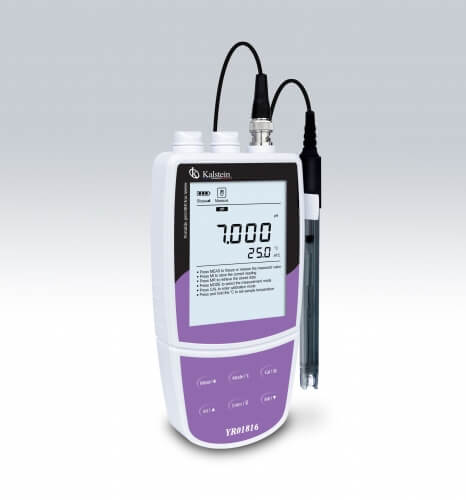
Installation and Startup Guide for the YR01817-3 Portable Ammonium Ion Meter
The YR01817-3 Portable Ammonium Ion Meter is a professional-grade instrument designed for outdoor applications, ensuring precision with an accuracy of ±0.5% FS. This guide will walk you through the complete installation and startup process to achieve accurate measurements from the very first use.
Understanding the YR01817-3: Features and Specifications
| Model | YR01817-3 | Brand | Kalstein |
|---|---|---|---|
| Measurement Range | 5 × 10⁻⁶ to 1 M, 1.8 to 35500 ppm | ||
| Accuracy | ± 0.5% FS | ||
| Calibration Points | 2 to 5 points | ||
| Power Supply | 3 AA batteries or DC 5V adapter | ||
| Memory Capacity | Stores up to 500 data sets | ||
| Weight | 300g |
Unboxing the YR01817-3: What to Expect
Upon receiving your YR01817-3, ensure that the package includes:
- YR01817-3 Portable Ammonium Ion Meter
- Instruction Manual
- Calibration Solutions
- 3 AA Batteries
- USB Communication Cable
Inspect all contents for any damage during shipping. If any items are missing or damaged, contact your supplier immediately.
Initial Setup: Positioning and Powering Up
Follow these steps for the proper setup of your YR01817-3:
- Positioning: Place the meter on a stable, flat surface, away from direct sunlight, high humidity, and vibrations.
- Powering Up: Insert the 3 AA batteries or connect the DC 5V adapter. Press the power button to switch on the device.
- Calibration: Perform the first calibration using the supplied calibration solutions. The meter allows you to select from 8 different concentration points, providing flexibility based on your required range.
Calibration Process: Ensuring Accurate Readings
Calibration is a critical step to maintain accuracy in measurements. Follow these steps:
- Prepare two or more calibration standards that bracket the expected concentration range.
- Navigate to the calibration menu on the LCD display.
- Select the number of calibration points (2-5).
- Immerse the probe in the first calibration solution, wait for a stable reading, and follow the prompts to complete the calibration.
- Repeat for the remaining calibration solutions.
Remember to store calibration data and verify with periodic recalibration based on usage frequency.
First Measurement: Validating Performance
After calibration, it's time to take your first measurement:
- Ensure the probe is clean and properly installed.
- Select the measurement mode on the meter.
- Immerse the probe into the sample solution, ensuring it is fully submerged.
- Wait for the reading to stabilize and record the value displayed on the screen.
If you encounter inconsistent readings, revisit the calibration steps to ensure accuracy.
Troubleshooting Common Startup Issues
Here are some common issues you may encounter during the startup process, along with their solutions:
| Symptom | Possible Cause | Solution |
|---|---|---|
| Device does not power on | Batteries are dead | Replace batteries or check the power adapter |
| Inconsistent readings | Improper calibration | Recalibrate with fresh standards |
| Error code E-03 | Probe malfunction | Inspect and replace the probe if necessary |
Maintenance Tips for Long-lasting Performance
To ensure the longevity of your YR01817-3, adhere to these maintenance practices:
- Regularly clean the probe after each use to prevent contamination.
- Store the meter in a protective case when not in use.
- Perform calibration at regular intervals based on usage frequency and environmental conditions.
- Check battery levels frequently and replace them as needed.
Frequently Asked Questions
What is the measurement range of the YR01817-3?
The YR01817-3 has a measurement range of 5 × 10⁻⁶ to 1 M, equivalent to 1.8 to 35500 ppm.
How often should I calibrate the YR01817-3?
Calibration frequency depends on usage, but it is recommended to calibrate the device before each significant measurement session.
What should I do if I receive an error code E-03?
Error code E-03 indicates a possible malfunction with the probe. Inspect it closely for damage and replace it if necessary.
Can I use the YR01817-3 for different types of ion measurements?
The YR01817-3 is specifically designed for ammonium ion measurements, and while it can provide accurate readings within this range, it should not be used for other ion types.
What is the power supply requirement for the YR01817-3?
The YR01817-3 can be powered by three AA batteries or a DC 5V adapter, providing flexibility in different operating environments.
How can I store data from the YR01817-3?
The YR01817-3 has a memory capacity that allows it to store up to 500 data sets, which can be reviewed later for analysis.
Where can I request a quote for the YR01817-3?
You can request a quote for the YR01817-3 and other laboratory equipment through our services.
If you are looking for a fusion of innovation and quality, you have come to the right place. At Kalstein, we offer you the luxury of exploring our exclusive catalog of laboratory equipment. We manufacture every device to the highest standards of excellence. Our intuitive and seamless online purchasing channels are designed for your convenience, securing the most competitive prices. Hesitate no longer — we bring science to life, it is time to become part of our community.